
Most wedding-album guides are listicles. Ten apps, three sentences each, no opinion. This one walks through the decisions that actually shape your guests' experience: how they join, when they see the photos, what happens to the gallery later. Real screenshots, opinionated defaults, no hype.
What a shared wedding photo album actually is (and what it isn't)
A shared wedding photo album is one collaborative gallery that every guest contributes to from their phone. The couple sees every photo in one place. Guests can usually see them too. There's no chasing people on WhatsApp the week after the wedding.
Definition: one collaborative gallery every guest contributes to
Think of it as a shared inbox for photos. Every guest's uploads land in the same event gallery. Full resolution. Chronological order. Viewable by the couple, and — depending on your settings — by the guests too.
How it differs from a group chat, an iCloud Shared Album, and a hired photographer's gallery
A WhatsApp or iMessage group chat is not a photo album. Both apps compress images and bury them in chat scroll the second someone replies with a heart emoji. A shared event album keeps photos at full resolution and in order.
iCloud Shared Albums and Google Photos shared libraries are closer, but they have a sign-up wall. iCloud needs an Apple ID. Google Photos needs a Google account. At a wedding with 80 to 150 guests, you will have at least one Android-only attendee and at least one guest who has forgotten their Apple ID password. Event-first apps sidestep this with a QR or link — no account required.
This also isn't a replacement for your wedding photographer. Your hired photographer delivers the polished, color-graded gallery weeks later. The shared album captures everything else — the candid moments only the guest next to it could have caught.
How guests actually join — the QR code question
The single biggest source of friction at weddings is sign-up. Anything that asks Aunt Carol to create an account, verify an email, and pick a password is going to fail. A QR code that opens the gallery straight from her camera app removes that step.
 The guest-side join screen after a QR scan — no account, no install prompt, straight into the event.
Why a QR is the lowest-friction join method at a wedding
Every modern phone already has a QR scanner — it's the camera app. Point, tap the notification, you're in. Compare that to typing a URL on a phone that's been in someone's clutch all night. The QR wins.
On the host side, you generate one QR for the event. That single code works for every guest. Print it once and reuse it everywhere. On the guest side, they open their camera, point it at the code, tap the banner, and land directly inside the event gallery. They can start uploading within seconds.
Printed-card and slideshow placement ideas
One QR in one location is not enough. Put it in three places, minimum: the welcome sign at the entrance, the table number cards at each seat, and an end-of-night slide on the reception screen.
Make it big. A QR the size of a postage stamp on a dimly lit table card will not scan. Aim for at least 2 inches square on print, more on the screen.
What happens if a guest doesn't have the app
There is always one guest who refuses to install anything. For them, a web fallback matters — the QR should open a browser-based upload page that works without an app install. Confirm the app you choose offers this before the wedding, not after. sync.camera supports a browser-based join path, but verify the current behavior on the pricing page or in the help docs before the event.
Free vs paid: how guest count and upload limits actually work
Almost every event-photo app has a free tier. Almost none will work for an actual wedding — the free tier is a try-before-you-buy demo for elopements and family barbecues.
Why most apps cap free events at a small guest count
Free tiers cap guest count, not feature set. sync.camera's free tier supports up to 7 guests at the time of writing — fine for an elopement with immediate family, not for a 120-person reception. Competitors apply similar caps (usually somewhere between 5 and 30 free guests).
If your guest list is in double digits, plan to pay. The cost of a wedding event tier is dwarfed by the florals, and unlike florals you keep the photos.
When unlimited uploads matter (hint: rehearsal + ceremony + reception = a lot)
Do the math. Eighty guests, three events across the weekend (rehearsal dinner, ceremony, wedding reception), each taking thirty photos. That's 7,200 photos. Realistically more, because someone always shoots video.
A paid event tier removes per-guest upload caps. Uncle Steve at the reception will fill an entire phone roll on the dance floor alone. You don't want him hitting a 20-photo limit at 9:30 PM.
Choosing a tier without overpaying
Look for three things on the pricing page:
- The guest cap at each tier. Map it to your real guest list with a 10% buffer for plus-ones.
- Whether "unlimited uploads" means truly unlimited or unlimited-but-compressed. Some apps downsample to 1080p, strip EXIF / photo metadata, and ruin anything you'd want to print. Verify the app stores originals.
- How long the gallery stays accessible after the event ends.
If two tiers fit, pick the smaller one — you can almost always upgrade mid-event. For a side-by-side, see our wedding photo app comparison.
Controlling when guests see the photos — the gallery-reveal decision
This is the setting almost no listicle mentions, and it changes the guest experience more than any other knob in the app. When do guests see the photos other guests have uploaded — during the event, after, or somewhere in between?
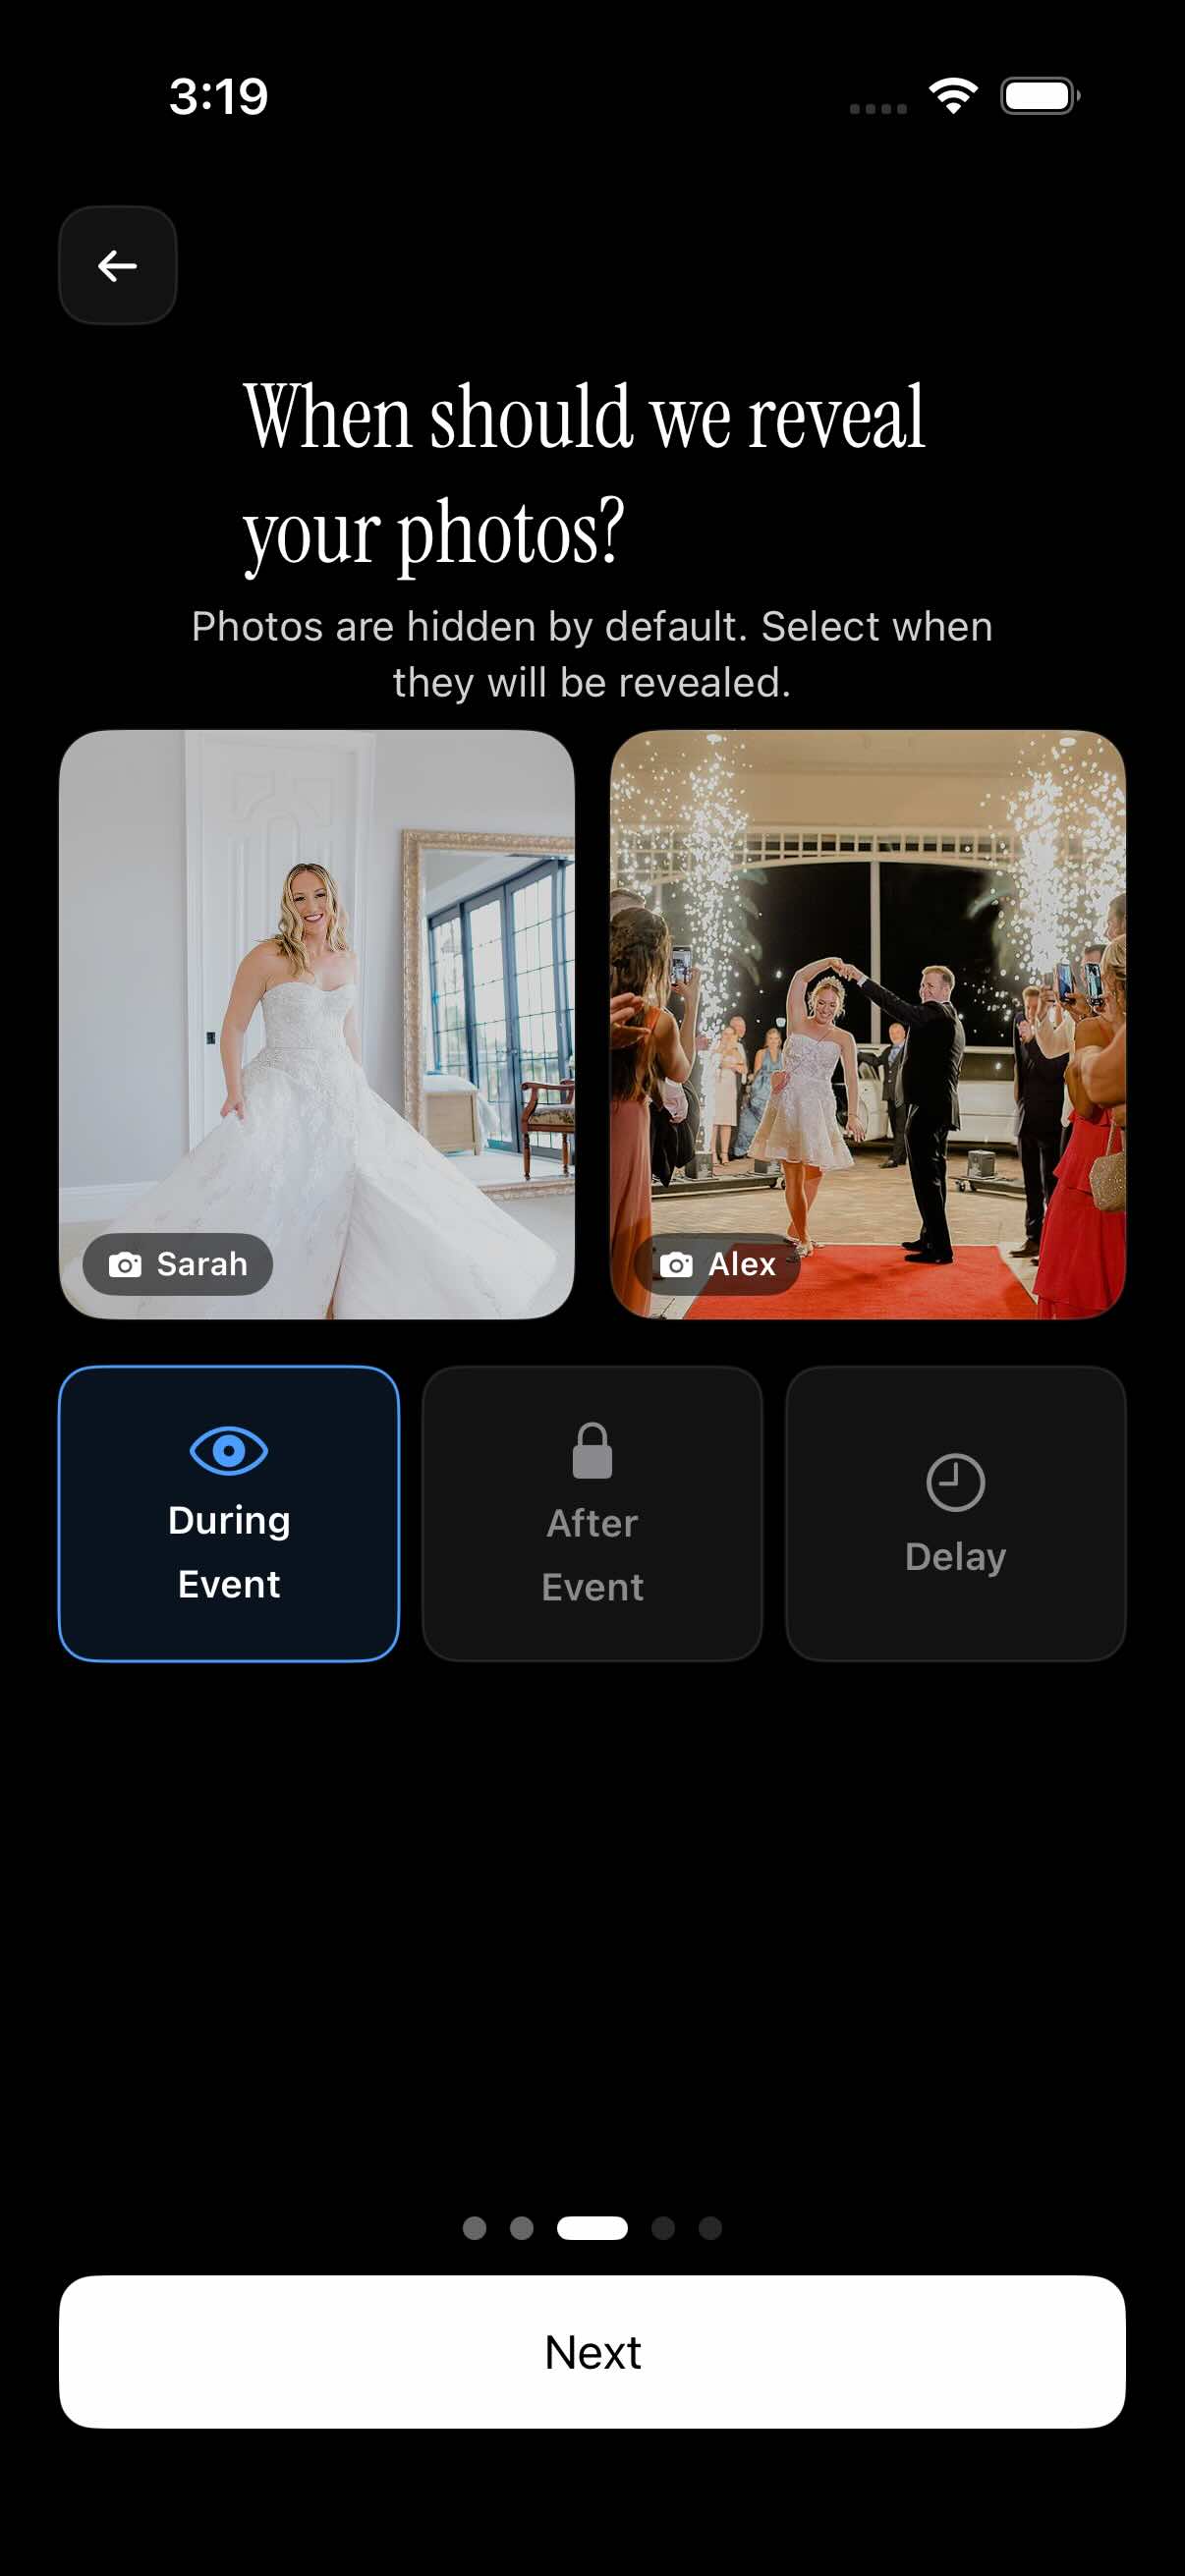 The three reveal modes side by side — pick the one that matches the vibe of the wedding, not the default.
There are three modes to compare. Each has a use case.
Reveal during the event: the live-slideshow vibe
During-event reveal means every photo is visible to every other guest immediately. Pair it with a reception slideshow on a big screen and you get the energy boost — guests see their own photo on the wall and start uploading more.
The trade-off: unflattering candids appear in real time. The shot of the groom mid-sneeze during the first dance hits the gallery before you can stop it.
Reveal after the event: keeps the surprise for the couple
After-event reveal hides all uploaded photos from guests until the couple flips the switch. The couple sees everything as it comes in; guests see nothing until the event ends.
This is the safe default for traditional weddings. The couple skims the gallery the next morning, hides anything truly bad, then opens it up. No awkward dance-floor shots competing with the first kiss.
Delayed reveal: balance between the two
Delayed reveal opens the gallery to guests automatically, but after a chosen interval — usually 24 hours or a week. It's the middle ground. The couple gets a curation window. Guests don't feel locked out forever.
Recommended default: "after event" for traditional ceremonies, "during event" for casual or destination weddings where you've explicitly set up a reception slideshow, "delayed" if you can't decide.
Talk to your wedding photographer before picking "during event." Some photographers don't love raw iPhone shots showing up on the reception screen next to their proofs.
Date windows, photographer filters, and other knobs worth knowing
A few more settings are worth your time. None of them are deal-breakers individually, but together they make the difference between a curated wedding gallery and a junk drawer.
 What your gallery looks like at the end of the night — every guest's phone, in one place, in order.
Setting an event date window so only wedding-day photos land in the album
The date window restricts uploads to photos taken within a start and end date. Set the start to the rehearsal dinner, the end to the morning after. Aunt Carol's accidental upload of last weekend's brunch gets rejected automatically.
Important: turn the date window on before you share the QR. Turning it on later does not retroactively filter photos already in the gallery.
Filtering the gallery by photographer or contributor
If your hired wedding photographer also uploads to the shared album (some do as a sneak preview), a photographer filter lets guests isolate the pro shots from the iPhone candids. It also works the other way — the couple can filter to a single guest's contribution to thank them for a specific shot.
What a finished wedding gallery looks like
A finished gallery has a few hundred to a few thousand photos. Mixed orientations. Some blur. A lot of cake. Several shots of the same toast from different angles — which sounds redundant, but is one of the best things about a shared album. You get the moment from everyone who was there, not just one camera.
Privacy, ownership, and the questions guests will actually ask
At least one guest will ask, "Where do these photos actually go?" Have an answer ready.
Who can see the album besides the couple
Almost all event-photo apps gate galleries behind a QR or link. They are not public web pages and not indexed by search engines under normal settings — but verify this for your chosen app by checking the help docs.
If you've turned on guest-visible reveal, every guest who joined sees the full gallery. If you've left it on "after event" with the toggle still off, only the couple sees anything.
What happens to the photos when the event ends
Event galleries are not forever-storage. Retention windows vary by plan — commonly 30, 90, or 365 days from the event date. The clock starts ticking when the event ends, not when the photos were taken.
The practical rule: download a full archive of the gallery within the first week. Back it up to your personal cloud (iCloud, Google Drive, Dropbox — pick one). Then share a view-only link with parents and the wedding party while the gallery is still live.
Download and export rights
Guests retain rights to the photos they took. That's the legal default, and most app terms of service mirror it. The couple gets a license to view and download. If a guest uploaded by mistake — a screenshot, a personal photo from earlier in the week — they should be able to delete their own contribution from the gallery. Confirm this is supported in the app you pick.
For a deeper dive on the privacy side, see our notes on running a private event photo album.
Step-by-step: setting up your wedding album in under 10 minutes
Here's the whole flow, from zero to QR-on-the-table.
- Create the event. Open the app, tap new event, give it the couple's names and the wedding date.
- Set the date window. Start at the rehearsal dinner, end the morning after. Uploads outside this range are rejected.
- Pick the reveal mode. "After event" is the safe default. Choose "during event" only if you've already planned a reception slideshow with your venue.
- Pick the tier. Free works for elopements with under 7 guests. For anything larger, pay for the event tier. Check the pricing page and map it to your real guest count.
- Generate the join QR. Save the high-resolution image. Send it to your stationer for table cards and the welcome sign. Add it to the slideshow file your DJ or venue will run.
- Assign an album wrangler. Pick one tech-comfortable friend — usually a sibling or a maid of honor — to handle the "my phone can't scan it" questions during cocktail hour. The couple should not be troubleshooting QR codes during their own wedding.
That's it. Total setup time, if you have the QR image ready for print, is under ten minutes.
Common mistakes couples make (and how to avoid them)
The failure modes are predictable. None of them are unfixable, and all of them are avoidable.
Picking a tool the day of the wedding
Test the app at the rehearsal dinner, not at the wedding. Run the full join flow — QR scan, upload, check it lands — with at least three phones (iPhone, Android, one older device). If something is going to break, it'll break here, and you'll have a day to fix it. For a primer on running this kind of test, see how to collect photos from wedding guests.
Forgetting to download before the gallery expires
Set a calendar reminder. The day after the wedding, the gallery feels permanent. Three months later, the retention window closes. Export the archive within the first week. Treat the event gallery as a transfer mechanism, not a vault.
Skipping the QR placement plan
If guests can't find the QR, they won't upload. One small QR on one welcome sign in a dim foyer is the most common failure mode. Place the code in at least three high-traffic spots — see QR code photo sharing for events and the best photo sharing app for events guide.
Choosing "during event" reveal without talking to your photographer
If you've hired a professional, ask before you flip on live reveal. Some photographers actively encourage it. Others would prefer their proofs not share a screen with iPhone candids. A two-minute conversation saves an awkward email later.
Skipping the web-fallback check
There is always one guest who refuses to install an app. Confirm the tool you pick has a browser-based upload path on both iOS and Android. Test it on a device with no app installed.
A shared photo album for wedding guests is one of the highest-leverage things you can set up before the day. Ten minutes of configuration captures every guest's perspective in one place. Pick the reveal mode deliberately, place the QR everywhere, and download the archive before the retention window closes. The rest takes care of itself.